Tips and Tricks For Applying Stencils and Stripes
There’s nothing that says ‘race car’ quite like a set of racing stripes. You can build a wild motor but keep it hidden under the hood. But if you want people to know you have a real muscle car, a set of stripes makes it easy to identify.

Some stripes came from the factory such as Super Sport stripes on the 1970-1972 Chevelles. At the same time, others were dealer-added, such as the Yenko-built cars. Whether you’re restoring a real SS, or want to add some flair to your ride – stripes are the way to go!
Are they painted or are they stickers? The answer is both! These stripes can be painted on, or just stickers. In some instances, we offer a stencil kit if you want to paint them, or a vinyl stripe kit if you want to just stick them on and not paint.
It’s not 100% necessary to purchase a stencil kit. You can lay them out yourself. However, a stencil kit saves valuable time and makes sure they are correctly spaced and laid out on the car. For Chevelle Stencils and Stripes click here, and for Camaro Stencils and Stripes click here.
Tools and Materials Needed For Stencils And Stripes
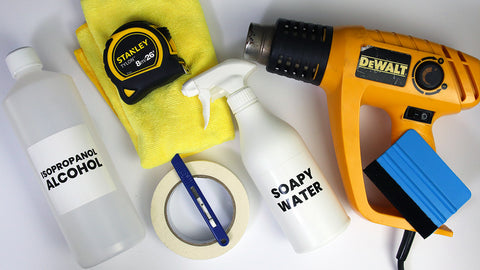
Before diving into the process, ensure you have the following tools and materials on hand:
Tools:
- Masking tape (high-quality, automotive grade)
- Measuring tape or ruler
- Utility knife or razor blade
- Squeegee or plastic applicator tool
- Tack cloth or microfiber towel
- Spray bottle filled with water and a few drops of dish soap
- Heat gun (optional, for difficult areas)
- Air compressor and blower nozzle (optional)
Materials:
- Stencil or stripe kit (specific to your model/year)
- Primer (if applying on bare metal)
- Base coat paint (usually the body color)
- Paint for stripes (commonly black, white, or custom)
- Clear coat (optional but recommended for protection)
Step 1: Preparation
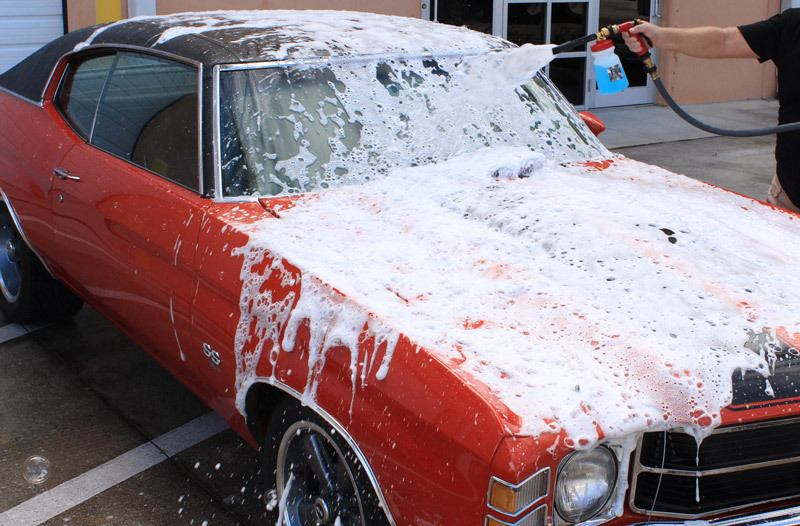
Clean the Surface
Start by thoroughly cleaning the surface of your car where the stripes or stencils will be applied. Use a high-quality wax remover or degreaser to remove any contaminants like dirt, oil, or grease. It’s critical to ensure that the surface is clean to avoid issues with the stencil adhering to the surface and to prevent imperfections in the paint.
- Wash the car with soap and water.
- Dry the surface completely.
- Wipe the area with a tack cloth or microfiber towel to remove any dust.
Surface Preparation
If you’re working with a freshly painted vehicle, it’s important to let the paint cure completely before applying stencils or stripes. Paint should typically cure for at least 30 days to avoid any lifting or damage when removing masking tape or stencils. If the surface is bare metal or previously painted, sanding the area lightly with fine-grit sandpaper (e.g., 600 grit) will help with adhesion.
Step 2: Planning And Measuring For Stencils And Stripes
Choose Your Design
Before you start, choose the stripe or stencil design that complements the style of your Chevelle or Camaro. For example, Camaros often feature bold rally stripes or SS stripes, while Chevelles might have cowl induction or racing stripes running along the hood and trunk. Ensure that your stripe kit or stencils are made specifically for your vehicle model and year for proper fitment.
Measure and Mark the Placement
Using a measuring tape, carefully measure the area where the stripes or stencil will be applied. Classic cars like the Chevelle and Camaro often have symmetry in their stripe designs, so ensuring the measurements are accurate is critical.
- Mark the centerline of the hood, roof, or trunk if applying racing stripes. This is especially important for dual stripes to ensure even spacing.
- Use masking tape to create guidelines for the edges of the stripes or to frame out the stencil area.
- Double-check your measurements for accuracy.
Step 3: Applying the Stencil or Stripe
Dry Application (for Adhesive-Backed Vinyl Stencils)
Many stencil and stripe kits use adhesive vinyl to mask the area where the paint will go.
Position the Stencil or Stripe: Start by carefully aligning the stencil or stripe along the guide marks you made earlier. Use masking tape to secure one end of the stencil to the car, forming a “hinge” that will allow you to slowly peel back the adhesive backing.
Apply the Stencil: Gradually peel the backing away from the stencil as you press the stencil or stripe down onto the car. Use a squeegee or plastic applicator to smooth out the material and remove air bubbles as you go.
Check for Air Bubbles: If you encounter bubbles, use a squeegee to smooth them out, or poke them with a fine pin and gently push the air out.
Trim Excess Vinyl: Once the stencil or stripe is fully applied, carefully trim any excess vinyl with a utility knife, particularly around the edges and body lines.
Wet Application (for Vinyl Stripes)
For larger vinyl stripes, a wet application technique may make it easier to position the stripes.
Spray the Surface: Lightly spray the area with the water and dish soap solution. This creates a lubricated surface that allows you to reposition the stripe if necessary.
Apply the Stripe: Peel off the backing paper and carefully lay the stripe onto the wet surface. Use the squeegee to press the stripe down and push out any water trapped underneath. Continue smoothing the stripe until it adheres evenly across the surface.
Allow Drying Time: Let the stripe dry for a few hours before removing any transfer tape.
Step 4: Painting the Stripes
Mask the Edges
If you’re painting the stripes directly onto the surface, use high-quality masking tape to cover the edges of the stripe area. You may also need to use plastic sheeting or additional tape to mask off areas of the car that shouldn’t be painted.
Apply the Paint
Using a spray gun or aerosol paint (depending on your setup), apply several light coats of the stripe color. It’s essential to build up the paint in thin, even coats to avoid runs or drips.
- Tip: Start by spraying the edges of the masked area and work your way inward.
- Let each coat dry thoroughly before applying the next.
- Typically, you’ll need about 3-4 coats for good coverage.
Remove the Masking
Once the paint is dry to the touch (but not fully cured), carefully peel away the masking tape. If you wait too long, the paint may lift with the tape, so it’s essential to find the right balance.
Step 5: Finishing Touches
Apply a Clear Coat (Optional)
For added durability and a professional finish, apply a clear coat over the painted stripes. This step is especially important for painted stripes, as it helps protect them from UV damage, oxidation, and chipping. Be sure to follow the manufacturer’s recommendations for drying and curing times between coats.
Remember to hop on SS396.com for all your stencil and stripe needs. If you have any questions, give our friendly techs a call at (203) 235-1200!